PHP使用GD库绘制表格(可根据数据自适应)
ps:真是代码写的久了什么需求都会遇得上,木得办法
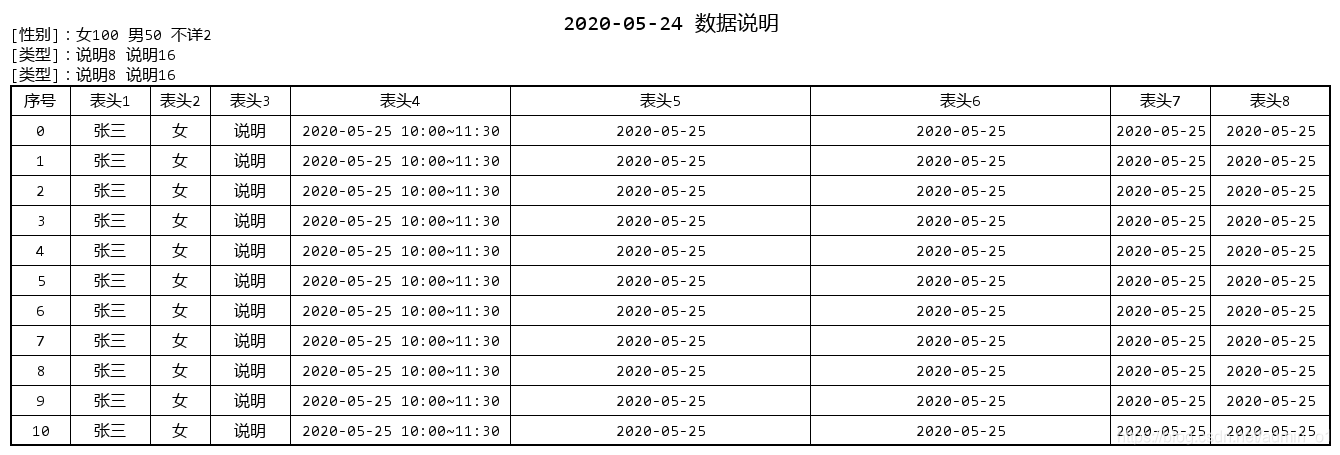
需求是需要用图片表格的样式展示数据,先看效果图:
就是一个表格,但是需要用图片的方式进行展示,再次感叹PHP的GD库真是异常强大!!!
先说完成的功能,按照下面的数据列子可以很方便的组织出这类表格,自定义表头信息以及根据数据需求自定义每一列的宽度和高度,代码会自动让数据居中显示。
[php]
/**
* 生成表格
*/
function create_table($params)
{
$base = [
'border' => 10,//图片外边框
'file_path' => $params['file_path'],//图片保存路径
'title_height' => 25,//报表名称高度
'title_font_size' => 16,//报表名称字体大小
'font_ulr' => './MSYHMONO.ttf',//字体文件路径
'text_size' => 12,//正文字体大小
'row_hight' => 30,//每行数据行高
];
$save_path = $base['file_path'] . $params['file_name'];
//如果表说明部分不为空,则增加表图片的高度
if(!empty($params['table_explain'])){
$base['title_height'] = $base['title_height'] * count($params['table_explain']);
}
//计算图片总宽
$w_sum = $base['border'];
foreach ($params['field_width'] as $key => $value) {
//图片总宽
$w_sum += $value;
//计算每一列的位置
$base['column_x_arr'][$key] = $w_sum;
}
$base['img_width'] = $w_sum + $base['border'] * 2-$base['border'];//图片宽度
$base['img_height'] = ($params['row']+1) * $base['row_hight'] + $base['border'] * 2 + $base['title_height'];//图片高度
$border_top = $base['border'] + $base['title_height'];//表格顶部高度
$border_bottom = $base['img_height'] - $base['border'];//表格底部高度
$img = imagecreatetruecolor($base['img_width'], $base['img_height']);//创建指定尺寸图片
$bg_color = imagecolorallocate($img, 255,255,255);//设定图片背景色
$text_coler = imagecolorallocate($img, 0, 0, 0);//设定文字颜色
$border_coler = imagecolorallocate($img, 0, 0, 0);//设定边框颜色
imagefill($img, 0, 0, $bg_color);//填充图片背景色
//先填充一个黑色的大块背景
imagefilledrectangle($img, $base['border'], $base['border'] + $base['title_height'], $base['img_width'] - $base['border'], $base['img_height'] - $base['border'], $border_coler);//画矩形
//再填充一个小两个像素的 背景色区域,形成一个两个像素的外边框
imagefilledrectangle($img, $base['border'] + 2, $base['border'] + $base['title_height'] + 2, $base['img_width'] - $base['border'] - 2, $base['img_height'] - $base['border'] - 2, $bg_color);//画矩形
//画表格纵线 及 写入表头文字
$sum = $base['border'];
foreach($base['column_x_arr'] as $key => $x){
imageline($img, $x, $border_top, $x, $border_bottom,$border_coler);//画纵线
$this_title_box = imagettfbbox($base['text_size'], 0, $base['font_ulr'], $params['table_header'][$key]);
$title_x_len = $this_title_box[2] - $this_title_box[0];
imagettftext($img, $base['text_size'], 0, $sum + (($x-$sum)/2 - $title_x_len/2), $border_top + ($base['row_hight']+$base['text_size'])/2, $text_coler, $base['font_ulr'], $params['table_header'][$key]);//写入表头文字
$sum += $params['field_width'][$key];
}
//画表格横线
foreach($params['data'] as $key => $item){
$border_top += $base['row_hight'];
//画横线
imageline($img, $base['border'], $border_top, $base['img_width'] - $base['border'], $border_top, $border_coler);
$this_first = imagettfbbox($base['text_size'], 0, $base['font_ulr'], $key);
$first_len = $this_first[2] - $this_first[0];
imagettftext($img, $base['text_size'], 0, $params['field_width'][0]/2 - $first_len/2+$base['border'], $border_top + ($base['row_hight']+$base['text_size'])/2, $text_coler, $base['font_ulr'], $key);//写入序号
$sub = 0;
$sum = $params['field_width'][0]+$base['border'];
foreach ($item as $value){
$sub++;
$this_title_box = imagettfbbox($base['text_size'], 0, $base['font_ulr'], $value);
$title_x_len = $this_title_box[2] - $this_title_box[0];
imagettftext($img, $base['text_size'], 0, $sum + (($base['column_x_arr'][$sub]-$sum)/2 - $title_x_len/2), $border_top + ($base['row_hight']+$base['text_size'])/2, $text_coler, $base['font_ulr'], $value);//写入data数据
$sum += $params['field_width'][$sub];
}
}
//计算标题写入起始位置
$title_fout_box = imagettfbbox($base['title_font_size'], 0, $base['font_ulr'], $params['title']);//imagettfbbox() 返回一个含有 8 个单元的数组表示了文本外框的四个角:
$title_fout_width = $title_fout_box[2] - $title_fout_box[0];//右下角 X 位置 - 左下角 X 位置 为文字宽度
$title_fout_height = $title_fout_box[1] - $title_fout_box[7];//左下角 Y 位置- 左上角 Y 位置 为文字高度
$save_path = $base['file_path'] . $params['file_name'];
if(!is_dir($base['file_path']))//判断存储路径是否存在,不存在则创建
{
mkdir($base['file_path'],0777,true);
}
//居中写入标题
imagettftext($img, $base['title_font_size'], 0, ($base['img_width'] - $title_fout_width)/2, 30, $text_coler, $base['font_ulr'], $params['title']);
//设置图片左上角信息
$a_hight = 20;
if(!empty($params['table_explain'])){
foreach ($params['table_explain'] as $key => $value) {
imagettftext($img, $base['text_size'], 0, 10, 20+$a_hight, $text_coler, $base['font_ulr'], $value);
$a_hight += 20;
}
}
imagepng($img,$save_path);//输出图片,输出png使用imagepng方法,输出gif使用imagegif方法
echo '<img src="/'.$save_path.'"/>';
}
[/php]
这是生成图片的方法,如果没有特殊需求完全不需要动这个方法里的代码,按照下面的示例传值即可。
[php]
//表格数据
$data = [
[
'name' => '张三',
'sexdesc' => '女',
'type1' => '说明',
'type2' => '2020-05-25 10:00~11:30',
'type3' => '2020-05-25',
'type4' => '2020-05-25',
'type5' => '2020-05-25',
'type6' => '2020-05-25',
],
];
//循环制造数据
for ($i=0; $i < 10; $i++) {
$data[] = [
'name' => '张三',
'sexdesc' => '女',
'type1' => '说明',
'type2' => '2020-05-25 10:00~11:30',
'type3' => '2020-05-25',
'type4' => '2020-05-25',
'type5' => '2020-05-25',
'type6' => '2020-05-25',
];
}
//图片左上角汇总说明数据,可为空
$table_explain = [
0 => '[性别]:女100 男50 不详2',
1 => '[类型]:说明8 说明16 ',
2 => '[类型]:说明8 说明16 ',
];
//表头信息
$table_header = [
0 => '序号',
1 => '表头1',
2 => '表头2',
3 => '表头3',
4 => '表头4',
5 => '表头5',
6 => '表头6',
7 => '表头7',
8 => '表头8'
];
//每个格子的宽度,可根据数据长度自定义
$field_width = [
0 => '60',
1 => '80',
2 => '60',
3 => '80',
4 => '220',
5 => '300',
6 => '300',
7 => '100',
8 => '120'
];
//参数
$params = [
'row' => count($data), //数据的行数
'file_name' => '数据_'.date("Ymd" , strtotime("+1 day")).'.png', //保存的文件名
'title' => date("Y-m-d")." 数据说明",
'table_time' => date("Y-m-d H:i:s"),
'data' => $data,
'table_explain' => $table_explain,
'table_header' => $table_header,
'field_width' => $field_width,
'file_path' => "./public/".date("Y-m-d")."/" //文件保存路径
];
//调用方法
create_table($params);
[/php]
作者:z1988
链接:https://www.z1988.com/1992.html
文章版权归作者所有,未经允许请勿转载。