1. 编译前先将已经安装的Nginx文件进行备份
通过ps命令查看nginx文件的路径。以下所有步骤都以自身nginx路径为准
ps -elf | grep nginx
cd /www/server/nginx/sbin/
cp nginx nginx.bak
2. 下载云锁防护模块压缩包
cd ~
wget https://codeload.github.com/yunsuo-open/nginx-plugin/zip/master -O nginx-plugin-master.zip
3. 解压云锁防护模块压缩包nginx-plugin-master.zip
unzip nginx-plugin-master.zip
4. 获取当前云锁模块所在目录的全路径
cd nginx-plugin-master/
pwd
5. 查看当前nginx加载的模块,在编译加载云锁防护模块的时候仍需加载这些模块
cd ~
/www/server/nginx/sbin/nginx -V
备注:将./configure arguents:之后的内容复制到记事本备用
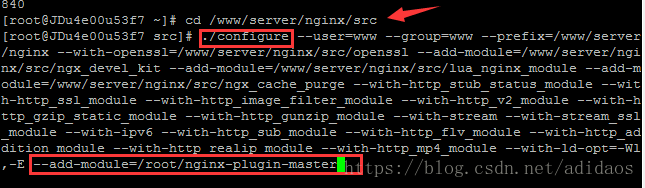
6. 进入nginx源码目录,对nginx进行编译
宝塔面板安装的nginx源码位于/www/server/nginx/src
编译时添加云锁防护模块参数,参数路径为第4步获取的云锁防护模块源码全路径“/root/nginx-plugin-master”
备注:编译内容为(./configure ’上一步记事本中的备用内容 –add-module=/root/nginx-plugin-master)
cd /www/server/nginx/src

./configure --user=www --group=www --prefix=/www/server/nginx --with-openssl=/www/server/nginx/src/openssl --add-module=/www/server/nginx/src/ngx_devel_kit --add-module=/www/server/nginx/src/lua_nginx_module --add-module=/www/server/nginx/src/ngx_cache_purge --add-module=/www/server/nginx/src/nginx-sticky-module --add-module=/www/server/nginx/src/nginx-http-concat --with-http_stub_status_module --with-http_ssl_module --with-http_v2_module --with-http_image_filter_module --with-http_gzip_static_module --with-http_gunzip_module --with-stream --with-stream_ssl_module --with-ipv6 --with-http_sub_module --with-http_flv_module --with-http_addition_module --with-http_realip_module --with-http_mp4_module --with-ld-opt=-Wl,-E --add-module=/root/nginx-plugin-master
7. Nginx1.8.0 以上和 Tengine 2.1.2 则需要修改objs/Makefile文件来支持post过滤
在Makefile文件中的CFLAGS=…-Werror -g后追加宏定义 -DHIGHERTHAN8
vi objs/Makefile
备注:按Insert后找到-Werror -g 添加 -DHIGHERTHAN8 ,添加之后按ESC:wq
make

8. make完成后将系统中原有的nginx用重新编译生成的nginx文件替换,替换后重启nginx使新编译nginx生效
到此通过PC端连接到服务器端,在PC端的界面上刷新后可以看到已识别nginx插件(由灰色变为绿色)。
rm -rf /www/server/nginx/sbin/nginx
cp objs/nginx /www/server/nginx/sbin/
service nginx restart
到此通过PC端连接到服务器端,在PC端的界面上刷新后可以看到已识别nginx插件(由灰色变为绿色)。
10. 测试防护是否生效
域名+/?order%20by
卸载
使用nginx.bak文件替换掉自编译的nginx文件,替换后重启Nginx。以下nginx路径与上述安装路径一致,实际以自身nginx路径为准。
cd /www/server/nginx/sbin/
rm -rf nginx
mv nginx.bak nginx
ervice nginx restart